

David Gil was 19 years old when he started working, in 1998, as a golf professional in Almenara (Sotogrande), creating the first CAR academy in Andalusia. He later traveled to England, where he worked at David Leadbetter’s Academy. Upon his return, he created the Sotogrande Golf School for Juniors, from which great professional players have emerged.
Always in the world of teaching, in 2010 he became involved in an international project in Sicily, where he was closely linked to the Italian national teams and coaches.
With a Master’s Degree in Golf Course Management, David has worked in Golf Operations in the best courses in Andalusia, until 2018 when he joined the project of Villa Padierna Golf Academy by Michael Campbell.
In 2021, David decided to create his own golf academy, DG GOLF ACADEMY, based in Marbella and recently in Switzerland.
.
LET’S GO FOR THE GREEN! The five keys to improve your putting
In previous classes we have talked a lot about strokes related to long game and also about the game around the green. In this lesson we are going to deal with the stroke that we repeat most often in our round of golf, the putt.
We will not go into the technique, as there are many valid variations. You will see many players with different grips, also using putts with different inches or models with more modern or more classic designs. Therefore, we are going to focus on the most important points or keys to improve it and how we have to practice them.
Improving on the green will help to have a very important improvement in your final result. I can even understand that, although at the professional level they spend a lot of time practicing this stroke, at the amateur level it is usually the opposite.
Whenever I go to the driving range I see more players playing the long game than putting, so, as always, I hope this class will help you meet the goal of improvement and I will try to make it a little more fun to practice this important part of the game as well.
What are the key points of putting?
1.- STANCE AND BODY AXIS
2.- IMPACT
3.- DISTANCE CONTROL
4.- READ THE FALLS
5.- BALL EXIT IN THE RIGHT DIRECTION
.
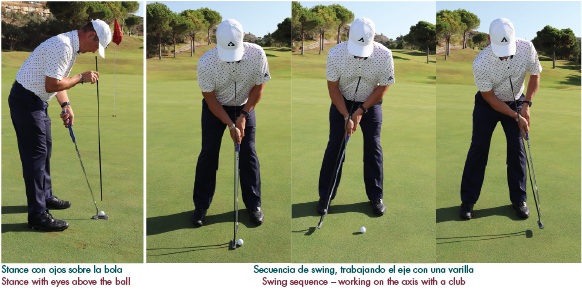
1. STANCE AND AXIS
In the introduction I mentioned that we would not touch on technique, but I just wanted to point out that we need to have a clear base of how to position ourselves and how the club moves.
We always talk about a standard putter.
BODY. We will look for the inclination of the back necessary so that our eyes coincide right on the line of the ball. I recommend that the opening of the legs be slightly wider than the shoulders, as this will help to lower our axis.
SHAFT. The shaft of the club will be well bent (relatively high hands) and this will help to keep the hands locked during our swing.
AXIS. Keeping our body firm and working as a block with our arms is basic to create a good angle and good line (I show exercise).
.

IMPACT
Many of you may have thought that I have forgotten to mention the swing line, but far from it. I certainly have not wanted to go into that subject, since putting is a stroke where we have to block our wrists, making a short swing, since the ball will not make any kind of effects with this club.
Here are several exercises to work on hitting with the center of the club face, the key point for the ball to roll the correct distance. These exercises will help us:
1) tees exercise. 2) coin exercise
.

3. DISTANCE CONTROL
In general, when I arrive at a putting practice area, most of those who are practicing do so by playing the holes. Not that this is bad, but I would also like to leave you with some exercises that will help you work on the distances.
1.- Ends of the green
From the center of the green, make uphill and downhill putts (especially if you have little time before teeing off), which will give you an important idea of the speeds of the greens of the course you are about to play.
2.- Skip the previous ball
With 4 or 5 balls, you hit the first one and, from that, with the following balls try to go longer, passing the previous one in half a meter and one meter.
3.- Working with tees.
Put tees on the putting green at short distances between 1 and 2 meters in this case from the hole and make series of 3 strokes. If you don’t get the three inside, repeat.
.

4. READ THE FALLS
We cannot talk about technique at this point, since it is a matter of visualization, but it is true that, although it is a key point when it comes to whether the ball goes in or not, at this point the important thing is to focus on:
-Hitting the ball with the center of the club face
-That the strength is correct
-That the line of departure of the ball is the one we want
On the subject of drops, I always recommend that you look at least from two different points at the shot and never place yourself on the ball with doubts about which direction you want to go.
.
5. BALL OUTPUT
This point is usually the one I spend more time on, especially with low handicap players and even professionals. Many of the times when we think that we have made a mistake in the fall of the green, (referring to the previous point) it may be that what has gone wrong is this point, the ball does not come out where you want it to. This issue, unless it is something very exaggerated, is difficult or almost impossible to see.
Therefore, try to work on the goal exercise (photo).


Leave a Reply